Data Analysis
The micro tomography computing infrastructure for the Imaging group is located at 2-BM:
Station |
Name |
Product |
Part list |
Model |
Quote |
2-BM |
tomo 1-2 |
MNJ15421064 |
Supermicro 740GP-TNRT node |
||
2-BM |
tomo 3 |
MNJ15421064 |
Supermicro 740GP-TNRT node |
||
2-BM |
tomo 4-5 |
MNJ16235754 |
Supermicro 220GQ-TNAR+ node |
||
2-BM |
tomodata1 |
MNJ15508749 |
SYS-220U-TNR Storage |
||
2-BM |
tomodata2 |
MNJ18897861 |
SYS-220U-TNR Storage |
At the APS
Your raw data are automatically copied from the detector to the analysis computer (handyn in this example) under the folder /local/data/YYYY-MM/PI_lastName.
Manual
To manually reconstruct a data set, use the tomopy cli tool.
[tomo@tomo1,~]$ bash
[tomo@tomo1,~]$ conda activate tomopy
then for help:
[tomo@tomo1,~]$ tomopy recon -h
To do a test reconstruction type:
[tomo@tomo1,~]$ tomopy recon --file-name /local/data/YYYY-MM/PI_lastName/file.h5
Automatic
To setup a reconstruction to start and publish automatically the results on a google slide with tomolog, edit tomorec_log
[tomo@tomo1,~]$ bash
[tomo@tomo1,~]$ conda activate tomocupy
(tomocupy) [tomo@tomo1,~]$ sublime ~/bin/tomorec_log
by updating the –presentation-url to match the new google slide url
#!/usr/bin/bash
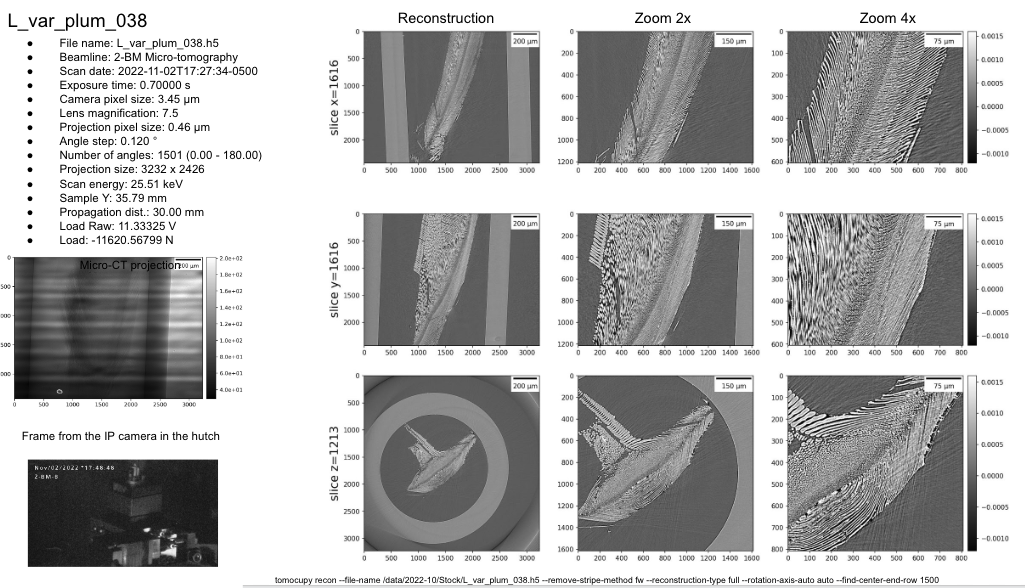
tomocupy recon --file-name $1 --remove-stripe-method fw --reconstruction-type full --rotation-axis-auto auto --find-center-end-row 1500
tomolog run --presentation-url https://docs.google.com/presentation/d/1YuxMttfW8w2sfwbaw634R3_LgPIsaHblz4Lrsjzn6ufQ/edit?usp=sharing --file-name $1 --beamline 2-bm --zoom [1,2,4]
then type:
(tomocupy) [tomo@tomo1,~]$ auto_rec /local/data/YYYY-MM/PI_lastName/
any new raw dataset uploade in /local/data/YYYY-MM/PI_lastName/ will be automatically reconstructed and results will be published on a google slide using tomolog.
At your home institution
Install the following:
Download and install anaconda python for your operative system.
Create a conda environment:
$ conda create -n tomopy python=3.9
Activate the newly created conda environment:
$ conda activate tomopy
Install tomopy:
$ conda install --channel conda-forge tomopy
Install dxchange:
$ conda install -c conda-forge dxchange
Install tomopy cli:
$ git clone https://github.com/tomography/tomopy-cli.git
$ cd tomopy-cli
$ python setup.py install
For Windows installation of tomopy-cli watch this video.
Install tomopy cli dependecy:
pip install opencv-python
To run a reconstuction you can now run:
$ tomopy recon --file-name /data/file.h5
Mosaic
For samples larger than the field of view we collect multiple data sets consisiting of overlapping tiles to form a mosaic. To reconstruct these type of data please use tile command-line-interface for mosaic tomography data processing.