AreaDetector
Install directions
Build EPICS base
Warning
Ensure that the disk partition hosting ~/epics is not larger than
2 TB. See the tech talk and
Diamond Data Storage
documentation.
Create the base directory:
$ mkdir ~/epics-ad
$ cd ~/epics-ad
Download and build EPICS base (latest release):
$ git clone https://github.com/epics-base/epics-base.git
$ cd epics-base
$ git submodule init
$ git submodule update
$ make distclean   # run this if there was an OS update
$ make -sj
Warning
If you see an error such as
configure/os/CONFIG.rhel9-x86_64.Common: No such file or directory,
set the host architecture in your csh terminal and rebuild:
$ setenv EPICS_HOST_ARCH linux-x86_64
Build ADSimDetector
Download assemble_synApps.sh to ~/epics-ad from:
Edit the assemble_synApps.sh script and include only the following
modules:
$modules{'ASYN'} = 'R4-44-2';
$modules{'AUTOSAVE'} = 'R5-11';
$modules{'AREA_DETECTOR'} = 'R3-12-1';
$modules{'AREA_DETECTOR_SUBMODULES'} = 'ADSimDetector'; # Space-separated list of extra submodules to check out
$modules{'BUSY'} = 'R1-7-4';
$modules{'CALC'} = 'R3-7-5';
$modules{'DEVIOCSTATS'} = '3.1.16';
$modules{'SSCAN'} = 'R2-11-6';
$modules{'SNCSEQ'} = 'R2-2-9';
$modules{'XXX'} = 'R6-3';
Comment out all other modules (e.g. ALLENBRADLEY, ALIVE, etc.).
Run the script:
$ cd ~/epics-ad
$ ./assemble_synApps.sh --dir=synApps --base=/home/beams/FAST/epics-ad/epics-base
Warning
Replace /home/beams/FAST/ with the path of your home directory.
The script creates a synApps/support directory:
$ cd synApps/support/
Build synApps:
$ make release
$ make -sj
Testing ADSimDetector
Move to the IOC boot directory:
$ cd ~/epics-ad/synApps/support/areaDetector-R3-12-1/ADSimDetector/iocs/simDetectorIOC/iocBoot/iocSimDetector
Rename envPaths to envPaths.linux:
$ mv envPaths envPaths.linux
Edit st.cmd.linux from:
< envPaths.linux
< st_base.cmd
to:
< ./envPaths.linux
< ./st_base.cmd
Edit start_epics from:
#medm -x -macro "P=13SIM1:, R=cam1:" simDetector.adl &
../../bin/linux-x86_64/simDetectorApp st.cmd.linux
to:
#!/bin/csh
setenv EPICS_APP_AD /home/beams/FAST/epics-ad/synApps/support/areaDetector-R3-12-1/ADCore
setenv EPICS_APP_ADSIM /home/beams/FAST/epics-ad/synApps/support/areaDetector-R3-12-1/ADSimDetector
#####################
# prepare MEDM path
#
if (! ${?EPICS_DISPLAY_PATH}) setenv EPICS_DISPLAY_PATH '.'
setenv EPICS_DISPLAY_PATH $EPICS_DISPLAY_PATH':'$EPICS_APP_ADSIM/simDetectorApp/op/adl
setenv EPICS_DISPLAY_PATH $EPICS_DISPLAY_PATH':'$EPICS_APP_AD/ADApp/op/adl
medm -x -macro "P=13SIM1:, R=cam1:" ../../../../simDetectorApp/op/adl/simDetector.adl &
../../bin/linux-x86_64/simDetectorApp st.cmd.linux
Warning
Replace /home/beams/FAST/ with the path of your home directory.
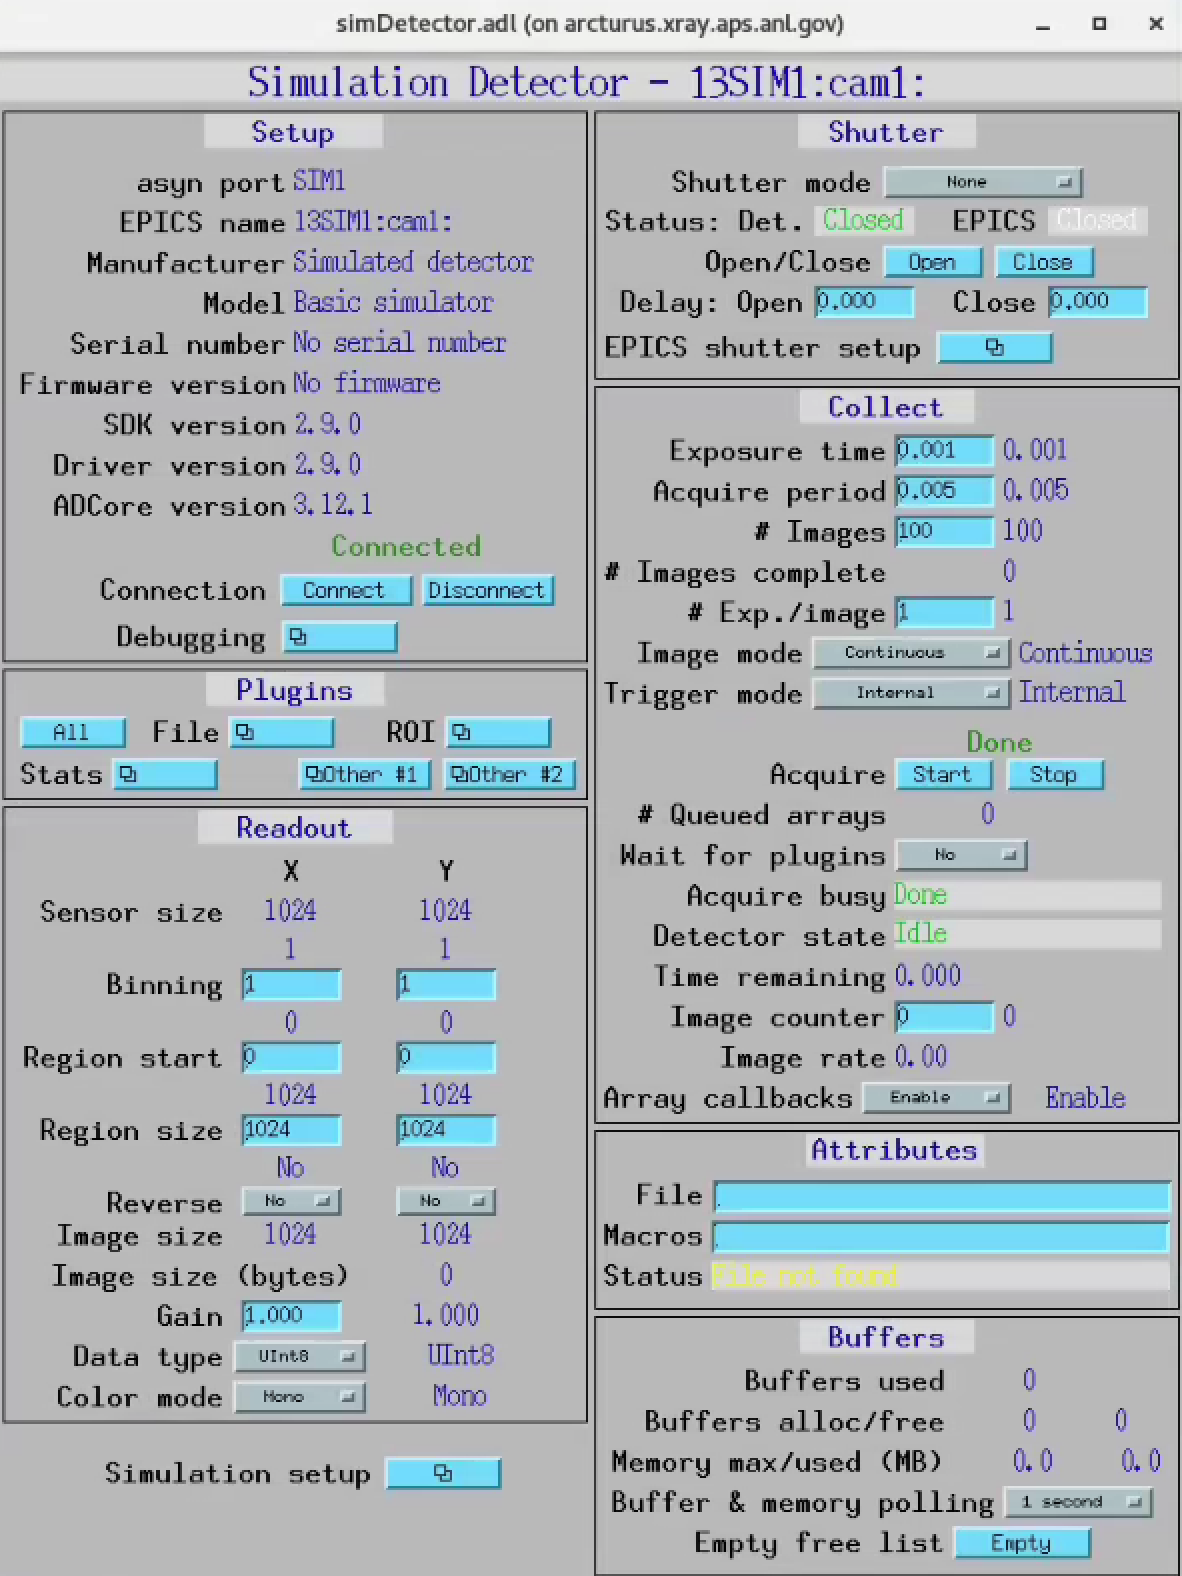
Start ADSimDetector
Run:
$ ./start_epics
Install ADAravis
Detailed instructions are available at:
Ensure that assemble_synApps.sh includes:
$modules{'AREA_DETECTOR_SUBMODULES'} = 'ADAravis ADGenICam'; # Space-separated list of extra submodules
Run assemble_synApps.sh:
$ cd ~/epics-ad
$ ./assemble_synApps.sh --dir=synApps --base=/home/beams/FAST/epics-ad/epics-base
Warning
Replace /home/beams/FAST/ with the path of your home directory.
Warning
If you see a make: No rule to make target ... Stop error, set
the host architecture in your csh terminal and rebuild:
$ setenv EPICS_HOST_ARCH linux-x86_64
Build ADGenICam:
$ cd ~/epics-ad/synApps/support/areaDetector-R3-12-1/ADGenICam
$ make -sj
(TODO: add instructions on ``envPaths`` and related files.)
Testing ADAravis
Move to the IOC boot directory:
$ cd areaDetector-R3-11/ADAravis/iocs/aravisIOC/iocBoot/iocAravis
Edit the camera name in st.cmd.Oryx_51S5. Replace the line:
# Name of camera as reported by arv-tool
epicsEnvSet("CAMERA_NAME", "FLIR-Oryx ORX-10G-51S5M-18011754")
with the values obtained from arv-tool:
# Name of camera as reported by arv-tool
epicsEnvSet("CAMERA_NAME", "FLIR-Oryx ORX-10G-51S5M-19173710")
epicsEnvSet("CAMERA_ID", "FLIR-Oryx ORX-10G-51S5M-19173710")
epicsEnvSet("CAMERA_INFO", "FLIR-Oryx ORX-10G-51S5M-19173710 (169.254.0.51)")
Edit start_epics as follows:
#!/bin/csh
setenv EPICS_APP_AD /home/beams/FAST/epics-ad/synApps//support/areaDetector-R3-12-1/ADCore
setenv EPICS_APP_ADGENICAM /home/beams/FAST/epics-ad/synApps//support/areaDetector-R3-12-1/ADGenICam
setenv EPICS_APP_ADARAVIS /home/beams/FAST/epics-ad/synApps//support/areaDetector-R3-12-1/ADAravis
#####################
# prepare MEDM path
#
if (! ${?EPICS_DISPLAY_PATH}) setenv EPICS_DISPLAY_PATH '.'
setenv EPICS_DISPLAY_PATH $EPICS_DISPLAY_PATH':'$EPICS_APP_ADARAVIS/aravisApp/op/adl
setenv EPICS_DISPLAY_PATH $EPICS_DISPLAY_PATH':'$EPICS_APP_ADGENICAM/GenICamApp/op/adl
setenv EPICS_DISPLAY_PATH $EPICS_DISPLAY_PATH':'$EPICS_APP_AD/ADApp/op/adl

medm -x -macro "P=13ARV1:, R=cam1:, C=FLIR-Oryx-ORX-10G-310S9M" ../../../../aravisApp/op/adl/ADAravis.adl &

../../bin/linux-x86_64/ADAravisApp st.cmd.Oryx_51S5
Warning
Replace /home/beams/FAST/ with the path of your home directory.
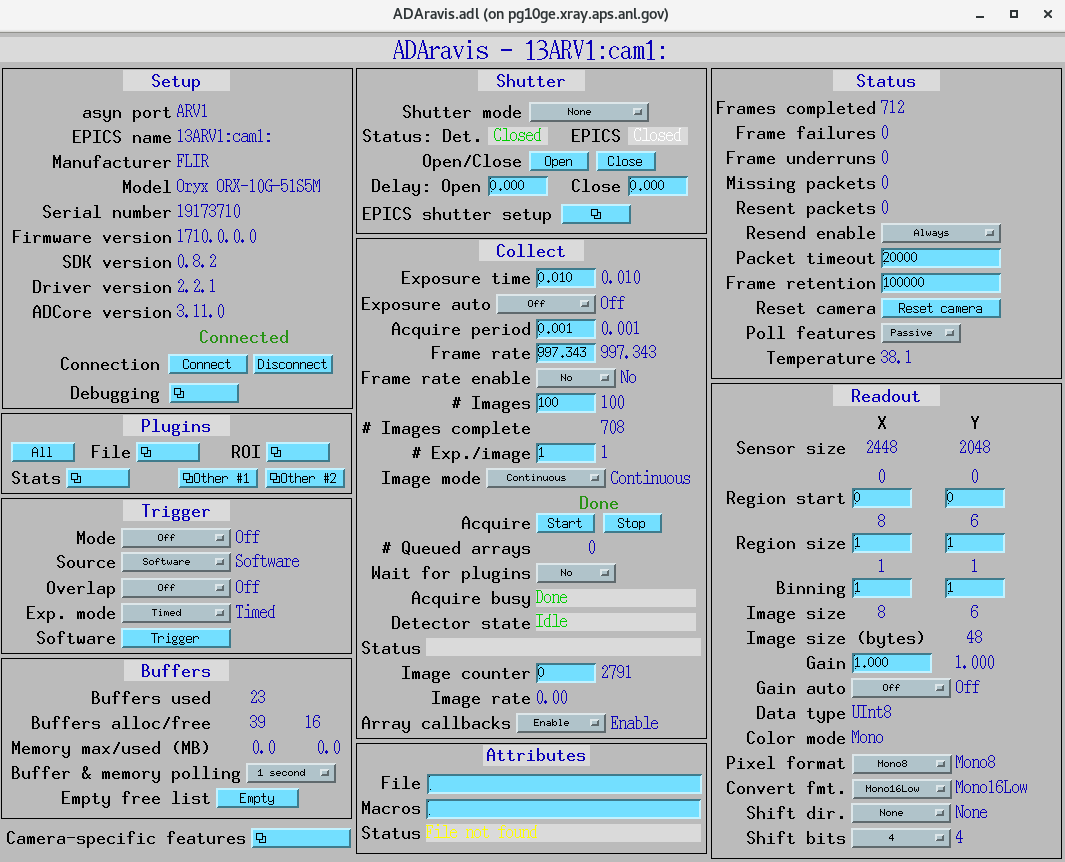
Start ADAravis
Run:
$ ./start_epics
Install ADSpinnaker
Detailed instructions are available at:
Ensure that assemble_synApps.sh includes:
$modules{'AREA_DETECTOR_SUBMODULES'} = 'ADSpinnaker ADGenICam'; # Space-separated list of extra submodules
Run assemble_synApps.sh:
$ cd ~/epics-ad
$ ./assemble_synApps.sh --dir=synApps --base=/home/beams/FAST/epics-ad/epics-base
Warning
Replace /home/beams/FAST/ with the path of your home directory.
Warning
If you see a make: No rule to make target ... Stop error, set
the host architecture in your csh terminal and rebuild:
$ setenv EPICS_HOST_ARCH linux-x86_64
Build ADGenICam:
$ cd ~/epics-ad/synApps/support/areaDetector-R3-12-1/ADGenICam
$ make -sj
Install the Spinnaker SDK on the Windows or Linux machine that will run the IOC. The SDK installs the required camera drivers.
(TODO: add instructions on ``envPaths`` and related files.)
Testing ADSpinnaker
Move to the IOC boot directory:
$ cd areaDetector-R3-11/ADSpinnaker/iocs/spinnakerIOC/iocBoot/iocSpinnaker
Edit the camera configuration in the appropriate startup script. For example, set the camera ID and info based on the camera used:
# Use this line for a specific camera by serial number, in this case a BlackFlyS GigE
epicsEnvSet("CAMERA_ID", "19173710")  # 2-BM-B 2bmbSP1:
epicsEnvSet("CAMERA_INFO", "FLIR-Oryx ORX-10G-51S5M-19173710 (169.254.0.51)")
Edit start_epics as follows:
#!/bin/csh
setenv EPICS_APP_AD /home/beams/FAST/epics-ad/synApps//support/areaDetector-R3-12-1/ADCore
setenv EPICS_APP_ADGENICAM /home/beams/FAST/epics-ad/synApps//support/areaDetector-R3-12-1/ADGenICam
setenv EPICS_APP_ADSpinnaker /home/beams/FAST/epics-ad/synApps//support/areaDetector-R3-12-1/ADSpinnaker
#####################
# prepare MEDM path
#
if (! ${?EPICS_DISPLAY_PATH}) setenv EPICS_DISPLAY_PATH '.'
setenv EPICS_DISPLAY_PATH $EPICS_DISPLAY_PATH':'$EPICS_APP_ADSpinnaker/spinnakerApp/op/adl
setenv EPICS_DISPLAY_PATH $EPICS_DISPLAY_PATH':'$EPICS_APP_ADGENICAM/GenICamApp/op/adl
setenv EPICS_DISPLAY_PATH $EPICS_DISPLAY_PATH':'$EPICS_APP_AD/ADApp/op/adl

medm -x -macro "P=13SP1:, R=cam1:, C=FLIR-Oryx-ORX-10G-310S9M" ../../../../spinnakerApp/op/adl/ADSpinnaker.adl &

../../bin/linux-x86_64/spinnakerApp st.cmd.oryx_51S5
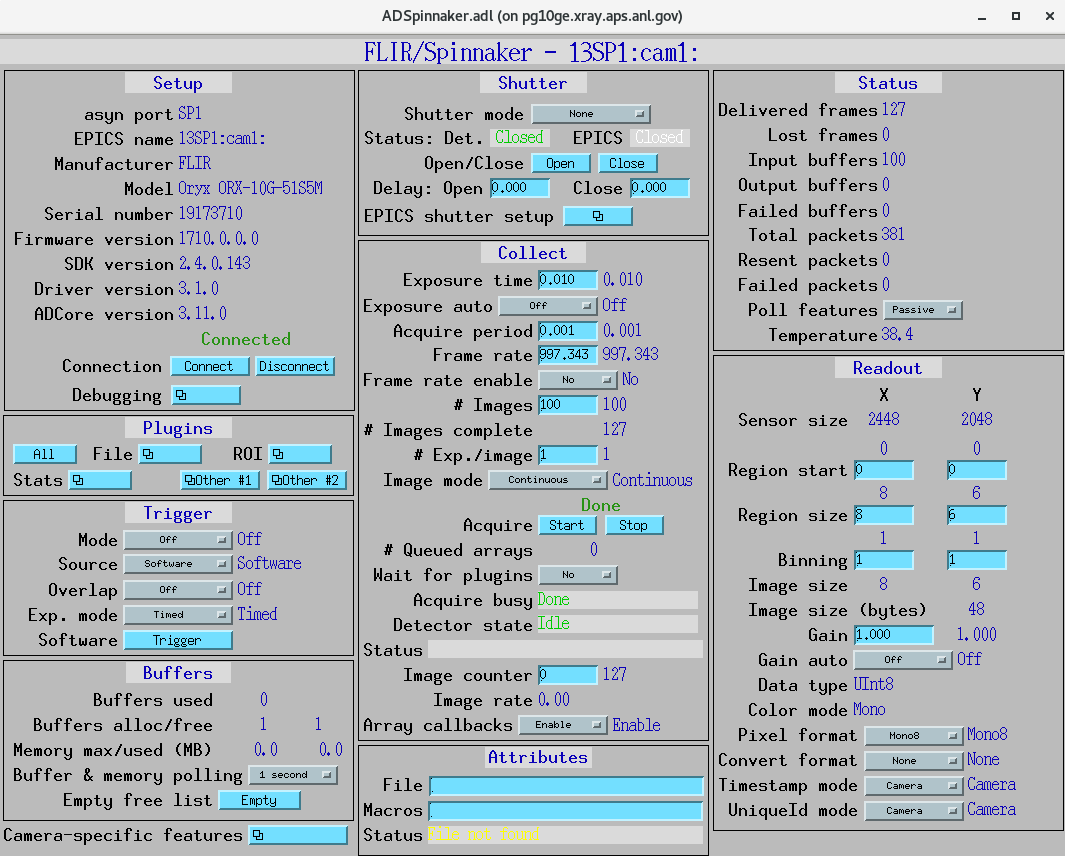
Start ADSpinnaker
Run:
$ ./start_epics
arv-tool
The arv-tool utility is part of the Aravis library and is used to
manage and query GenICam-compliant cameras. It can be used to extract
the camera XML description file, which is needed to automatically create
the EPICS database and MEDM screens.
Clone and build Aravis:
$ git clone https://github.com/AravisProject/aravis.git
$ cd aravis
Install Meson and Ninja:
$ pip install --user meson ninja
Add ~/.local/bin to your PATH (for example in .bashrc):
export PATH=$HOME/.local/bin:$PATH
Build and install Aravis:
$ meson setup builddir --prefix=$HOME/aravis-install
$ cd builddir
$ meson compile
$ meson install
Add the local installation to the environment:
export PATH=$HOME/aravis-install/bin:$PATH
export LD_LIBRARY_PATH=$HOME/aravis-install/lib:$LD_LIBRARY_PATH
export PKG_CONFIG_PATH=$HOME/aravis-install/lib/pkgconfig:$PKG_CONFIG_PATH
export GI_TYPELIB_PATH=$HOME/aravis-install/lib/girepository-1.0:$GI_TYPELIB_PATH
List all cameras connected to the computer:
$ arv-tool-0.10 --list
Use arv-tool to download the camera XML file. This XML file is
required by ADGenICam to generate the EPICS database and MEDM screens.
See the ADGenICam documentation for details:
Configure NIC on 10 Gbit FLIR cameras
Requirements:
64 GB memory
Cat 6A cable
Intel X550T2 Ethernet Converged Network Adapter X550-T2 (available from Sorcium as Part#: 3E9073)
Enable jumbo packets.
Disable DHCP and set a fixed IP address on the Ethernet port connected to the FLIR camera.
Increase the receive buffer size (MTU ≈ 9000).
Increase the relevant network parameters in the kernel.
Set the NIC TX queue length.
Steps 2–4 are documented in:
Additional details for step 4 are in:
ADGenICam: https://areadetector.github.io/master/ADGenICam/ADGenICam.html#linux-usb-and-gige-system-settings
For step 5, edit /etc/sysctl.conf:
net.core.rmem_default=26214400
net.core.rmem_max=268435456
For step 6, edit /etc/rc.local and add:
# NIC camera settings and 10 Gb NIC settings
# In this example the camera is attached to ens1f1
/usr/sbin/ifconfig ens1f1 txqueuelen 3000  # hardware specific; some NICs support up to 4096, others ~512